Saturday, February 18, 2017

Hamburger Potato Chowder

I only call this soup a chowder because it has a light, thin broth similar to clam chowder. Whatever you decide to call it: it's DELICIOUS. Besides, "Hamburger Veggie Soup" just doesn't sound as good. ;) You can make this with breakfast sausage or hamburger. We've made it both ways and our family seems to like hamburger better. We've also found we really like red potatoes in it. Brown russet potatoes work well, too. It's just a feel good soup in which we never have any leftovers.

[Read all of recipe before beginning ;)]

Ingredients:
5 cups chicken broth (see note)
2 cups carrots, diced small
1 celery rib, diced very small
5 red or brown potatoes, diced small
1/2 cup finely chopped onions
3-4 cloves garlic, pressed in garlic press
1 lb hamburger (or sausage or half a pound of each, we prefer hamburger but both are great)
1 12oz can evaporated milk
2 Tbsp broth (from soup -see instructions)
1 Tbsp cornstarch

Note about broth: I've found we really like the Knorr Chicken Flavor Bouillon in the mexican aisle
If you choose to do the bouillon, we do 1 Tbsp for every cup of water. Feel free to adjust this to your own tastes. Place water in a bowl with bouillon and warm it up in the microwave for about 2-3 minutes. Stir until bouillon is mixed well.

Directions:
Into a 3.5 quart pot, add broth, carrots, celery, and potatoes.
Cook all veggies in chicken broth until potatoes are about half done. I do a taste check at this point. I usually add some pepper, but rarely any salt.

While you are simultaneously cooking the veggies, in a 3 quart pan, cook the hamburger, onions, and garlic. I VERY lightly salt my hamburger and sprinkle some pepper over it. Brown it until done. I like to break my hamburger up so it is fine. It is a soup that you want to get a little of everything in every bite. I don't like any of the hamburger or veggies being too big.

Remove any grease from the hamburger. Add this to the veggies when the potatoes are half done. Allow to simmer until veggies are VERY close to done. When the veggies are tender, add evaporated milk and stir. You can serve it at this point. OR, if you want it just slightly thicker, you can remove 2 Tbsp of broth to a small bowl and stir in 1 Tbsp of cornstarch. Stir until smooth and then add back into the soup. Do one last taste test and serve.

We love this soup with biscuits or breadsticks or even just saltines. So delicious and just warms you right up! Simple and delicious!

Wednesday, November 30, 2016

Milky Way Blondies

These Blondies are.... Decadent. Divine. and Dangerous. ;) You won't want just one. And, as her recipe states, they're flexible with what you can put into them. I make a great caramelita. These kind of remind me of them except without the oatmeal. I also thought they'd be good using leftover Halloween candybars like in Heidi's candybar cookies. SO many possibilities with this blondie recipe. I had to include it on my blog for that reason. The purpose of my blog has *always* been to have it be an external recipe box of nearly all my favorite recipes.... whether they are tried-and-true recipes passed down within our own family, ones I've received from others and made my own, ones I tweaked to my preferences from other websites, or even recipes from other bloggers. I so appreciate good food and the time that goes into making a recipe. I always link back to the original recipe and indicate any changes made. With that in mind, here is the recipe for Milky Way Blondies!

2 cups brown sugar, packed
1/2 cup butter, softened
2 eggs
1 Tbsp pure vanilla extract
1 tsp baking powder
1/2 tsp salt
2 cups flour
1/2 cup Caramel Bits (or chop caramel squares into fourths)
3/4 cup mini chocolate chips
15 Fun Size Milky Way Candy Bars, chopped 

I used my Bosch for this recipe with the paddles. If using an electric mixer, use a large bowl!

Cream brown sugar and butter. Add eggs and vanilla. Combine and then sift in flour, baking powder, and salt. I mix the flour in only until incorporated. You'll be mixing it more when you add the caramel bits, chocolate chips, and candy bars. I prefer not to overmix. Add in your bits, chips, and bars! 

Spray a 9x13 pan with cooking sprain over anyone... especially someone who LOVES chocolate and caramel! y. If desired, line the pan with parchment and spray with cooking spray. The original recipe calls for foil. Myself, I do not prefer foil when baking these kinds of things. I'm kind of a parchment gal. When using parchment, use one section going long ways in the pan and another section going the width of the pan. Leave some hanging over the edge on all sides. Just be sure to use spray! ;) Spread the blondie mixture into the pan and bake at 350 degrees for 22-24 minutes.  Err on the side of looking not done-ish on these. You don't want hard, dry blondies on the outer edge. Mine took about 23 minutes. But every oven is different. They will continue to cook and set up as they cool. Cool completely before cutting. I did these bars the night before like I do for my caramelitas and they were perfect to cut with a good, sharp knife. I cut them to get 15 bars. 

The result is a delectable dessert that will win over anyone.... especially someone that loves chocolate and caramel! ;)

Refer to original recipe for other mix in ideas.

Tuesday, November 29, 2016

Ridiculously Delicious Lemon Butter Cookies

I found this recipe while looking for a different recipe. Naturally, I love new recipes and simply could not resist a cookie recipe with cream cheese in the batter. And, as an added bonus, it came from a recipe blog with the name "wicked good kitchen." How could it not be amazing!? haha.... These cookies are RIDICULOUSLY delicious. So soft. So delicate. Full of lemon flavor but not over the top. I'm totally in love with them. I prefer to double this recipe. It makes about 40 cookies when doubled.

2¼ cups flour (can also be gluten free, see original recipe for how)
2 tsp baking powder
1 8oz pkg cream cheese, softened (I like Philadelphia best)
½ cup butter, softened
1½ cups sugar
2 Tbsp freshly grated lemon zest, from 2-3 large lemons
1½ Tbsp freshly squeezed lemon juice
1 tsp pure vanilla extract
1/2 tsp pure lemon extract (or 1/8 tsp lemon oil or, if using essential oils, one drop for a double batch)
1/8 tsp natural yellow gel based food coloring -I chose to omit this and it was okay
3/4 tsp salt 
1 large egg plus 1 large egg yolk
1 cup powdered sugar for rolling & dusting cookies

I used my Bosch for this recipe with the paddles. If using an electric mixer, use a large bowl.

Cream the cream cheese and butter until smooth. Add sugar, zest, lemon juice, vanilla, lemon extract or oil, food coloring -if desired, and salt. Mix until light and fluffy, scraping sides as you go. Add egg and egg yolk and beat at medium speed for 2 minutes. At this point, the batter will look very light and creamy and airy. YUM! Sift in flour and baking powder gradually, on low speed. Mixing only until incorporated. You don't want to over mix this batter.

At this point, I like to scrape all the batter into a glass bowl and put a lid on it rather than just covering my Bosch and placing it in the fridge. The batter must refrigerate at least 2 hours but is best if left in the fridge overnight. 

When you are ready to bake the cookies, preheat oven to 325 degrees, with rack in the lower third of your oven. I like to use a cookie scoop that is about a 1 Tbsp size. This helps immensely for getting similar sized cookies. The batter will still be pretty sticky. I prefer to put the powdered sugar on a plate to roll my cookies. I've done the ziploc method. I feel the plate does a better job getting the cookies coated to my liking. Using a Tbsp measuring spoon, or a cookie scoop of the same size, scoop a generous 1 tbsp size dollop of dough and place it on the powdered sugar plate. Using your hand, make the dough into a round ball coating it well in powdered sugar as you go around. Place on a parchment paper lined cookie sheet. You'll want to keep the spacing about 2 inches apart for optimal baking.
Bake for 14 minutes. These cookies should not be golden brown. If they are browned, they'll be over cooked. They will have slightly soft centers. This is okay! Remove from oven and allow them to cool on the cookie sheet while the next batch is baking. I like to use a fine sifter and very lightly dust the top of the cookies with additional powdered sugar to give it a more finished look. Not too much. Just a little dusting. ;)
Transfer cookies to a wire rack to finish cooling. When I am doing a double batch, I am always sure to use fresh parchment each time I put another pan in the oven. Also be sure your pan is cool before you put another round of dough balls on it.

These cookies are so delicious. Not sure if I mentioned that! haha. They're a light cookie and always very well received when I make them for someone.

Thursday, November 17, 2016

The BEST Chocolate Cake.... Ever!


This recipe is from Six Sister's Stuff who got it from Taste of HomeIt is by far one of the best chocolate cake recipes and it is my go-to recipe for chocolate cake or cupcakes. It is easy and always delicious! It is even super yummy right out of the oven with a scoop of ice cream. No frosting, just warm cake and ice cream!

1 3/4 cups all-purpose flour
2 cups sugar
3/4 cup baking cocoa (I prefer dutch cocoa)
1 1/2 teaspoons baking soda
1 1/2 teaspoons baking powder
1 teaspoon salt
1 cube (1/2 cup) butter, melted
1 cup buttermilk

2 tsp good vanilla (I like mexican or Kirkland brand)
2 eggs
1 cup boiling water


Chocolate Ganache or desired frosting to go on top
(Ice Cream is also delicious if you put a scoop on top of a hot chocolate cupcake in a bowl right out of the oven. It is amazing!) So many options! There's a reason it's our FAVORITE cake! Don't overcook and it will be your favorite too.

Ganache instructions:
Heat 1 cup of heavy cream just to boiling. Pour over chopped chocolate in a bowl and allow to sit for about 5 minutes then stir until smooth with a whisk. I like to use a 4oz semi sweet and a 4oz milk chocolate Ghiradelli baking bar for ganache. Mix and match to your liking. I haven't used chocolate chips. I'm more a baking bar girl, but you can experiment if you'd like. I use 1 Tbsp on the top of each cupcake and allow to setup. Or eat right away with a fork and spoon for ooey gooey goodness. ;)

*Frosting*: (I use my cream cheese frosting recipe here) *A note: For cupcakes, you may want to do a double batch of frosting depending on if you pipe it or just spread it on. I found a regular batch only pipes about 18 cupcakes. One batch works great for a 9x13 cake. Follow recipe directions for chocolate frosting.

Cake Instructions: Preheat oven to 350 degrees. 

Put a small pot of water on the stove to boil (or if you have REALLY hot tap water, you can use that as well. You'll only need one cup but I always boil a little extra. ;)


I usually make this recipe in my Bosch, but a large bowl and a hand mixer works great as well. Just remember, you don't want to over mix. 


Combine all dry ingredients. Add in the butter, buttermilk, vanilla, and eggs. Don't mix this too high. You want to just get it fully incorporated. I stay on low speed. Pour in 1 cup of hot water. Mix. At this point, your batter will seem runny, but it's going to be okay... I promise!. At this point, either grease muffin liners or a  9×13″ pan. Fill cupcakes 2/3 full (which is about 1/4 cup for a larger muffin pan). You don't want them fuller than that! Bake for 12-15 minutes. If not quite done, do 2 more minutes. Mine are almost always done right at 15 minutes. I usually set the timer for 10 minutes and peek on them and add 2 more minutes and take them out. For a cake, bake for 30-35 minutes (or until a toothpick inserted into the middle of the cake comes out clean). Just don't overcook so that it isn't dry. This cake is perfection when cooked just the right length. When everything is cooled (cupcakes cool quick!), frost as desired, and decorate if you'd like.


This recipe makes about 32 cupcakes (depending on the size of your pan) or ONE 9x13" pan of cake. I use an IKEA muffin tin which is about a 1 1/2 sized cup. I use the jumbo liners for these found in the cake decorating isle at Walmart. I only fill the cups with a 1/4 cup measuring cup and it makes 27 cupcakes exactly every time. Or you can make a bundt cake (heavily buttered and floured inside in all those creases!) and then pour ganache over top and enjoy!

Sunday, October 30, 2016

Pumpkin Pie Tarts

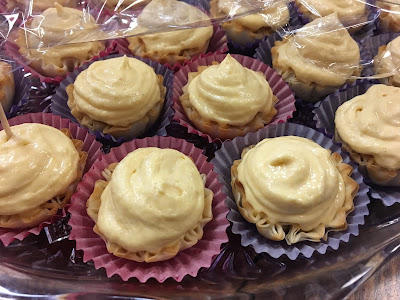
I found the recipe for these tarts from a facebook post then another similar one on pinterest. However, I did not care for cool whip in the recipe and the cream cheese ratio was off. So I have adapted the recipe to my liking and had a much better texture and flavor in my opinion. Also, this recipe was originally a "fruit dip." However, felt that it was perfect for a tart with a light phyllo cup crust. The result is a super light, delicious bit-size dessert. They don't last long either! Everyone I've made them for has loved them. A big bonus: they're REALLY easy!

2 8-ounce packages of cream cheese
2 cups powdered sugar
1 cup pumpkin puree
1 tsp ginger
1/4 tsp pumpkin pie spice
1/2 cup heavy whipping cream
4 boxes Athens brand mini fillo (Phyllo) shells (found in frozen food section near the pie crust)

Beat cream cheese & powdered sugar until fluffy. Add pumpkin, spices, and cream. Beat until combined and refrigerate for at least an hour. When ready to eat, bake phyllo shells for 5 minutes at 350 degrees. These cool really fast. When cool, pipe filling into each "cup." About 1 1/2 Tbsp I would guess. This mixture makes about 60 cups exactly. I just use a ziploc bag with the corner snipped off to pipe. Makes it easy and it is disposable. This recipe halves easily for 30 which is perfect for a small crowd. Most people like to eat 2-3 so take that into consideration.


Note: I have never refrigerated these after being filled because I always fill them and then serve. And I have never had any leftover so I do not know how the crust fares being refrigerated afterward. If you have leftover filling, it stays good in the fridge for several days. Probably 3-5. It is a delicious filling for crepes! For crepes, I simply use 1/4 of a recipe if I am only feeding my own family. For others, I would do a half recipe of the filling. Hope you enjoy!

Thursday, August 18, 2016

Salisbury Steak Meatballs

I found this recipe on Pinterest. A friend suggested some things she had changed and then I made a couple more. I apologize in advance that there are no pictures. (See original recipe for pics of the deliciousness!) My family gobbled it all up so fast, I didn't have a chance to take any pictures. I'll remedy that later & update the post. Take my word for it, this recipe is delicious! Here's the recipe with my changes:

*indicates my changes

For meatballs:
1 1/2 lbs ground beef
1/2 cup bread crumbs (I used the plain ones I had on hand)
1 egg
*2 large cloves garlic, pressed 
1/4 cup ketchup
1/4 cup coarse grain mustard (I used dijon mustard I had on hand and did just under 1/4 cup)
1 Tbsp Worcestershire sauce
1 tsp seasoned salt
1/2 tsp pepper
1 tsp onion powder
2 Tbsp olive oil (for frying)

For gravy:
2 Tbsp butter
1 onion, chopped fine and set aside
1 Tbsp Worcestershire sauce
*1 can Campbell's beef consommé
2 Tbsp cornstarch
1/2 tsp seasoned salt
1 Tbsp ketchup
Parsley for garnish (optional)

*Mashed Potatoes:
4 large russet potatoes 
1 cube butter
1/4-1/2 cup heavy whipping cream
Salt and pepper to taste

Directions:
Note: I prefer to make the meatballs ahead earlier in the day. It makes the balancing of cooking the meatballs, dicing potatoes for mashed potatoes, turning the meatballs, and all that so much easier! Before I start cooking the meatballs, I also premeasure the gravy ingredients and set aside for quick adding.

In a bowl, mix everything for meatballs together except for the olive oil. Roll into 1" balls. Should make close to 40 meatballs. (I think got just under 40.)

In a skillet, over medium-high heat, add olive oil. Add meatballs, about 20 at a time -depending on the size of your pan. (Mine was a 12" pan.) Don't overcrowd the meatballs. You want plenty of space to be able to turn them over. The original recipes suggests leaving 1/2" buffer zone around the meatballs to avoid meatballs falling apart. Cook the meatballs well on all sides (you want them completely cooked on the inside). Take cooked meatballs out and set aside. I put mine on a plate with foil over them. Repeat with remaining meatballs.

For the gravy, once the meatballs are all done cooking, add the butter and onions to the pan. Using a rubber, heat resistant spatula, stir the butter and onions around. You'll pick up all that yummy goodness left behind by the meatballs. It will add excellent flavor to your sauce. In a bowl, add the cornstarch to the consommé and whisk well to get rid of any lumps. Keep stirring the onions around until they are softened and translucent. Add in the consommé/cornstarch mixture as well as the other gravy ingredients. Mix well with spatula and allow to thicken. This will take about 3-5 minutes. I like to lower the temperature to low after it thickens and add the meatballs at this point. I cover the pan while I finish mashing the potatoes.

Mashed Potatoes directions: 
Peel and dice potatoes. Boil until tender. Drain and pour potatoes into bowl for mixing or into bosch mixer. With mixer or in bosch (with whisk attachment), beat potatoes with butter, cream, and salt and pepper. Add small dashes of extra cream if needed. These mix up fast. Don’t over mix. Taste test for fluffiness as well for taste. Add salt and pepper to taste.

Serve meatballs over mashed potatoes and enjoy! Absolutely delicious!!!

Adapted from Jo Cooks.

Thursday, March 24, 2016

The BEST Lemon Bars

from Eve Waite
Crust:
1 cup butter
1/2 cup powdered sugar
2 cups flour

Knead together with pastry cutter. Will be crumbly. Press into 9x13 people and bake 20 minutes at 350 degrees.

Filling:
4 beaten eggs
2 cups sugar
1/2 cup lemon juice
5 tbsp flour
1 tsp baking powder

Mix and pour over crust. Return to oven for 25 min. Sprinkle with powdered sugar and allow to cool. Cut into bars and enjoy!

Note: Someday I will get a picture of these! They always disappear too fast!

Nutella Krispie Treats

from Pioneer Woman
(with my changes)


6 Tablespoons Salted Butter, divided
10 ounces, weight Large Marshmallows
1/8 teaspoon Salt
1/2 cup Nutella
5 cups Rice Krispies
1-1/2 cup Miniature Marshmallows
1 cup Pecans, Finely Chopped
2 to 2 1/2 ounces, weight Semi Sweet Chocolate Melted (use bar, not choc chips)
(I like Ghiradella baking bar best. It always melts down nicely and looks good on top when it hardens) 

Melt 4 tablespoons butter in a large saucepan over medium-low/low heat. I like low best for my stove just so I don't overheat the marshmallow mixture.(If you over heat the marshmallow mixture, it's hard to mix with the cereal and you'll have really chewy treats.) 

Add marshmallows and salt and stir until melted. Halfway through the melting process, add Nutella. When Nutella and marshmallows are melted, add additional 2 tablespoons of butter and stir until smooth.

Meanwhile, melt semi-sweet chocolate in microwave for 1 1/2 minutes at 50% power. Remove from heat and let it cool slightly.

Add Rice Krispies to a large bowl and fold in the Nutella mixture. When it's almost all combined, add mini-marshmallows to the bowl, then continue folding until everything's combined.

Immediately press mixture into a thoroughly greased 9 x 13-inch pan. Sprinkle with half (or all) the pecans, pushing them into the sticky treat just a little. Drizzle semi-sweet chocolate in zig-zags all over the top of the treats. Sprinkle the other half of the pecans on top if you didn't use them all before. Put pan into freezer long enough to set chocolate, then cut into squares. Chocolate will harden again as it sets up. Serve. If there is any leftover, keep in air tight container.

Easy Sugar Cookies

These sugar cookies are a deli-style sugar cookie. More like what you'd get from subway or someplace like that. They're not a Valentine or Christmas cookie style sugar cookie. These are great when you've got a craving for sugar cookies because they whip up fast and they make about 2 dozen perfectly every time. I can't remember where I got the recipe years ago, but it is quick and easy and they always turn out great and soft!
2 3/4 cups all-purpose flour
1 tsp baking soda
1/2 tsp baking powder
1 cup butter, rooom temperature
1 1/2 cups white sugar
1 egg
1 tsp vanilla extract

1. Preheat to 375 degrees. In a small bowl, stir together flour, baking soda, and baking powder. Set aside.

2. In a large bowl, cream together the butter and sugar until smooth. Beat in egg and vanilla. Gradually blend in the dry ingredients. Roll rounded teaspoonfuls of dough into balls, and place onto ungreased cookie sheets. I like to push down just slightly on the top of the dough ball with my palm so they cook flatter for speading frosting later.

3. Bake 8-9. Don't overcook! Let stand on cookie sheet 2 minutes before removing to cool on wire racks. Cool completely and frost as desired.

Friday, February 5, 2016

Stuffed Pepper Soup

1 lb ground beef
1 onion, diced (as fine as you prefer)
2 cloves finely minced
1-2 cups* cooked long grain rice (not instant), *see note below
4 cups beef broth (I like Pacific beef broth in the box)
2 cans Campbell’s Beef Consommé
2 14.5 oz cans diced tomatoes, undrained
2-4 green bell peppers**, chopped (I like mine cut small), **see note below
1/4 cup brown sugar
2 tsp salt
1 tsp pepper 
1 Tbsp Worcestershire sauce, plus a small dash

Cook long grain rice according to package directions. In a large pot (at least 3.5 qt size), brown hamburger with onion and garlic until beef is no longer pink. Drain any grease from hamburger mixture. Add beef broth, beef consommé, tomatoes, green peppers, brown sugar, salt, pepper, Worcestershire and rice. Turn heat up to medium high and bring to a boil. Reduce heat to low, cover with lid, and simmer for 35-45 minutes.

Serve with saltine crackers. This soup gets even better the next day and makes great leftovers.

*Note: I prefer only 1 cup of rice because I like more broth in my soup and, if there are leftovers, the rice soaks up plenty of the broth. If you like your soup less "brothy," then use two cups of rice. The result will be a slightly thicker soup and that is still delicious

**Note: The original recipe calls for 2 green peppers. I have since used several different kinds of peppers with great results. I love the look and taste of the green peppers. Orange and yellow are equally as pretty and tasteful. So I began using two green peppers, 1 orange pepper, and one yellow pepper (or just two orange or two yellow). I always dice my peppers very small so it wasn't overly pepper-y. It has been delicious with 4 peppers each time and I will probably continue to do it this way from now on.

Variation: When serving, sprinkle freshly grated Parmesan cheese and serve with breadsticks.

Recipe adapted quite a bit from sixsistersstuff.com

Changes made:
8 cups beef broth—I use 4 cups plus 2 beef consommé (much better flavor!)
2 lbs ground beef—1 lb was plenty for my taste
2 cups rice - I use only 1 cup rice to have more broth
2 peppers - I use 4 peppers (combining green with orange/yellow peppers)
1 Tbsp Worcestershire - I like to add one extra splash ;)

Sunday, December 6, 2015

Baked Beans

from Corliss Whitehead

1 lb ground beef, finely browned and all grease dabbed off
1 lb bacon, fried well and cut up small
2 medium-sized onion,s finely diced
1 large can Bush's baked beans
1 can black beans, drained & rinsed well
1 can kidney beans
1 can small red beans
1/2 cup ketchup
1/2 cup Sweet Baby Ray's BBQ sauce (or your favorite bbq sauce)
1 cup brown sugar
2 Tbsp mustard
2 tsp vinegar
Dash of salt, pepper, & garlic powder

Mix all together and put in crockpot on high for 1 hour, then turn to low for 4-5 hours. Beans should be soft and onions translucent. Serve with your favorite main dish! We like to serve it with babyback ribs or bbq chicken. Great for a group!

Note: If you prefer your beans not to have hamburger, go ahead and leave it out, but don't skimp on the bacon! It adds GREAT flavor! I didn't use hamburger this time (see picture) and it still tasted great. I have never been a baked bean fan until I had these baked beans at a community get together. I am always on the hunt for a tried & true recipe so I asked for it. Thankfully the recipe is easy and delicious! This recipe makes plenty for my family of 6 with leftovers. However, I asked my friend about doubling the recipe and she said when she doubles it, she ONLY doubles the beans and leaves the rest the same with great flavor. :) 

Sunday, November 29, 2015

Buffalo Chicken Chili

1 lb chicken, cooked and shredded
15 oz can white navy beans
14.5 oz can fire roasted tomatoes
2 cups chicken broth
1/4 cup buffalo chicken wing sauce (Frank's Red Hot Wings Buffalo Sauce)
1 pkg dry Ranch dressing mix
1 cup frozen corn kernels (we like super sweet white frozen corn)
1/2 tsp onion powder
1/2 tsp garlic powder
1/2 tsp celery salt
1/2 tsp freeze dried cilantro (I've used finely chopped fresh with success as well)
1/4 tsp (optional to add at end if needed)
4oz to 8oz of cream cheese, softened to room temperature (do not use low fat, result is a grainy soup)
Bleu cheese crumbles, optional

1. Cook chicken
2. Simmer all ingredients except cream cheese for 30 minutes. Or 4-6 hours on low in crockpot.
3. Remove from heat and add cream cheese in small chunks.
4. Whisk carefully until smooth and serve with bleu cheese crumbles

More in depth instructions:
I like to use my crockpot to cook my chicken with a little chicken broth. I put all remaning ingredients, except cream cheese, in a bowl to combine with chicken later. I just keep it in the fridge until I'm ready. Makes it fast and easy! However, this is originally all done in the crockpot & you can do it that way as well. Your chicken just needs to be cooked first. A word of caution, if you don't like the "heat" from the buffalo sauce, start with 2 tbsp and then add in 1 tsp increments at the end to your desired heat. I've found 1/4 cup is just right for me and my family. The recipe originally called for 1/2 cup and that is a hold-onto-your-seat level of hot for our family. So, test it out and see what works best for you.

Once my chicken is cooked and shredded, I pour the ingredients from the bowl into a 3.5 quart pot and add the chicken. I bring it to a boil over medium high heat, then turn temperature to low and simmer for 30 minutes. (Note: if you do this in the crockpot, you can cook it on low for 4-6 hours.) Remove from heat and add the cream cheese in small clumps using a fork. Allow cream cheese to warm up in soup, then carefully whisk until the cream cheese is melted down and smooth. I used to use an entire package of cream cheese, but I've since found that about 6 oz is right. Perfect amount of creamy and buffalo heat. If you're trying to cut calories, just use 4 oz. However, the cream cheese tempers the buffalo sauce "heat." If some of your family likes it hotter than others, simply place the bottle of hot sauce on the table to add additional "heat."

Recipe adapted from crockpotgourmet.net. My changes include: chicken broth reduced from 4 cups to 2 cups, not draining the beans or tomatoes, reduced cream cheese, and optional salt.

This recipe makes about 12 cups. Nutritional facts per serving: Calories-163, Fat (g) 5.1, Carbs (g) 12.3, Protein (g) 15.6.

I could not get a picture of this because we would always forget! My family loves it. I barely remembered to get a picture until the bowl was almost gone. It isn't a flattering picture but I promise the picture doesn't do it justice. The chili/soup is delicious and I always get rave reviews when I share it with family and friends! Hope you enjoy!!!

Sunday, November 16, 2014

Chicken Tortellini Soup


Adapted from Point of Grace
3T olive oil
2 good sized garlic cloves, finely minced (I use a garlic press)
3 stalks celery, finely chopped
3 carrots, peeled and chopped
1 small onion, finely diced
5 oz pkg frozen spinach (I used pict sweet)
2 cans cream of chicken soup
Just under 2 cans water
32 oz chicken broth
1 to 3 tsp chicken bouillon (add to taste)
Salt and Pepper to taste
Family size package (3lbs) of cheese or chicken tortellini, half cooked (we used the four cheese tortellini from Costco)
2 lbs chicken, cooked and diced (I cook mine in the oven or crockpot with some chicken broth and pepper)

Put olive oil in the bottom of a large soup/stock pan. Over medium heat, saute garlic, celery, carrots and onions until tender. (I used freezer carrots from the garden. They were perfect and so good!)

Add the half package of frozen spinach. Break up blocks of spinach as you cook. Continue to saute until spinach thaws, then heats up. Add cream of chicken soup and water (I use the leftover chicken juices from cooking and one tsp of chicken bouillon). Add chicken broth and bring to a low broil. Add chicken bouillon, salt, and pepper to taste. Don't over do it because all the flavors will merry nicely when the noodles and chicken are added, but you don't want it too bland either.

In separate pot, bring 6 quarts of water and some salt to a low boil. Throw in noodles for about 1 minute. Using slotted spoon, remove noodles and put into soup mixture. Add chicken and stir. Remove from stove and allow to sit and warm up for a few minutes. It will warm up on its own if you had it at a nice low boil before you added the noodles. Don't leave it on the unit or you'll overcook the noodles. Serve and enjoy!


Note: I was actually surprised this recipe had cream of chicken soup as an ingredient. It is not an overriding flavor in the soup as it has plenty of liquids to dilute it. If you like gnocchi, this would be a fun soup to try with it instead of the tortellini.

Thursday, November 6, 2014

Candy Bar Madness Chocolate Chip Cookies

AKA: Halloween Leftover Cookies

Every Halloween we have LOTS of candy that I prefer my kids not eat and rather not drag it out for a long time either... So one year I decided to sneak into their stash and get all the candy bars that I could find and create some cookies to use them up. :) They weren't too happy with me for stealing their candy without asking, but when they tried the cookies all was soon FORGIVEN! ;)
Now they go through and give me as much as they can part with to repeat the cookies every year.

Here is the basic recipe that I follow
3/4 cup granulated sugar
1 cup brown sugar
1 cup butter (no margarine)
1 Tbsp. vanilla
2 eggs, slightly beaten
3 cups flour
3/4 tsp. baking soda
3/4 tsp. salt
3-4 cups of cut up candy bar mixture and some chocolate chips too :)
       **I put in m&ms, snickers, crunch bars, Hershey's chocolate bars, almond joy (all bars are cut up into small chunks).... the choice of what candy is yours :)

Preheat oven to 350 degrees.
In a large bowl, combine sugars. Add in butter and cream together with the sugar. Add vanilla and eggs. Mix together.
In a separate bowl, combine the flour, baking soda, and salt (I combine all of this in the sifter and then sift them). Add to the creamed mixture.
Mix well (the dough will be stiff). Add the chocolate chip, candy bar mixture. Mix well to make sure enough dough surrounds the added goodness!

Line the cookie sheets with parchment paper. Take a spoon full of dough and put it on the cookie sheet.
You should fit about 12 per sheet. (I roll mine into a ball then sort of squish it down a little but you could probably just put the spoon full directly on parchment)

Bake 10-12 minutes. Be sure not to over cook them or they will end up being hard discs LOL... they should look a little under done and almost getting golden on top  (but they will be golden on the bottoms)
Remove from oven and let set for a minute or two then remove the cookies and place on wire racks to cool . Enjoy!

Wednesday, December 18, 2013

Chicken Noodle Soup


This is an update from an older post. Each time I made this, I found I was making the same adjustments. It was time to update the blog to reflect that. I love this recipe and always have lots of compliments when I've taken it to people.

2 lbs chicken, cooked & cut up
I prefer to cook my chicken in the crockpot with 1 cup water & 2 tsp chicken bouillon & sprinkle with pepper.

Once chicken is cooked, in a large pot combine:
2 quarts chicken broth, I use Pacific organic chicken broth
1 quart water
1+ cup chicken juices leftover from crockpot (I usually use all that is leftover)
1/4 cup chicken soup base
1 large family size cream of chicken soup (26oz)
1 regular can cream of chicken soup (10 3/4 oz)
2 tsp dried minced onion
3+ carrots, grated
pinch of dried minced garlic
Dash of pepper
Very small dash of celery salt (my kids won't eat celery!)

1 24oz bag Reames frozen noodles (or use your own homemade noodles)
Start cooking the noodles in their own pot of water.Important: I usually sprinkle just a little bit of chicken bouillon in it to give them some flavor. Cook noodles until half done. These noodles take a bit to cook but I've fooled many people into thinking they're homemade... so it's worth the time to let them cook. (I've never mastered the whole homemade noodle thing, so I leave the work to Reames. However, my sister makes my mom's homemade noodle recipe all the time. Click here if you want authentic homemade noodles.) 

Meanwhile, put water, chicken bouillon granules, chicken soup base, cream of chicken soup, minced onion, and pinch of minced garlic in a large pot.I prefer to cook it on medium to help start the flavors to mix together. I use a whisk to make sure the soup mixes into the broth well. Once it is slightly boiling, grate carrots into the pot. These add great flavor and texture. And my kids eat the soup better if they are grated and not chopped. Plus, they cook faster that way. Allow the soup to continue a medium boil.

Once the noodles are almost done, throw them in the broth and let them finish cooking and absorb the flavor. The broth will also thicken from the starch of the noodles. Keep the soup at a rolling boil, being sure to stir often so the noodles aren't sticking to the bottom.Finally, add chicken. Add a dash of pepper for taste. I usually taste test along the way just to be sure it doesn't need a little more chicken soup base or bouillon. The cream of chicken soup usually does a great job of adding great flavor while still keeping the broth very chicken-noodle-like. I let it cook just a couple minutes past the noodles being done to be sure the chicken has absorbed lots of flavor from the broth.
After the noodles are done and it has passed a couple of taste tests, serve up with your favorite roll, breadsticks, or just a simple side salad! I promise you won't be disappointed. It's hard to mess this soup up.
It makes a big batch. Perfect for making some for your family & taking some to the neighbors or someone who just needs homemade chicken noodle soup in their life! :) This soup is also amazing served over homemade mashed potatoes! Oh heaven!!!